Massage Chair Manual: Setup, Use, and Care Guide
The crate is at the door, the packaging is already in the recycling bin, and your new chair is now occupying the space where a side table used to sit. Before you press the power button, a few practical questions usually surface: Is there enough room to recline? Is the outlet suitable? Did the assembly go together correctly? A massage chair manual can list the rules, but it doesn't always explain how those rules affect the chair in everyday use.
This guide treats the first week like a calm recovery-room orientation. You'll learn how to position the chair, connect it without forcing plugs, choose a sensible first program, adapt pressure for different bodies, recognize faults that require service, and build small care habits that protect the chair over time. The same approach supports relaxation, post-workout recovery, and comfortable long-term wellness use.
The First Hour with Your New Chair
A large chair can look manageable in the box and surprisingly imposing once it reaches full recline. Start by checking the room rather than the remote. Stand at the chair's intended location and trace the full movement of the backrest and footrest, allowing clearance from walls, furniture, curtains, and walking routes. You also need a clear path from the entryway to the final position, especially when delivery involves lifting the base and backrest separately.
Before assembly, inspect the packaging and components for visible damage. Keep the massage chair manual open beside the parts instead of relying on memory. The sequence matters because the wiring, brackets, covers, and moving sections are designed to meet in a particular order.
Practical rule: Don't make the first session a rushed test. A measured setup gives you a better chance of noticing a loose connector, restricted movement, or unsuitable outlet before the chair is carrying your full weight.
Check the outlet and breaker before plugging in. The relevant question isn't whether a socket is nearby. Your chair's manual should identify the required voltage and frequency, and the outlet should be dry, grounded, and appropriate for that specification. Manuals also warn against damp areas, heat sources, wet hands, damaged cords, and pulling the plug by its cable. Those details protect against electrical faults as well as avoidable mechanical problems, as shown in this massage chair electrical safety manual.
Once the chair is in place, leave the covers accessible and test each movement slowly. The first successful recline is more useful than an immediate long massage because it confirms that the chair has room to travel and that nothing has been trapped underneath.
Unboxing and Assembly the Right Way
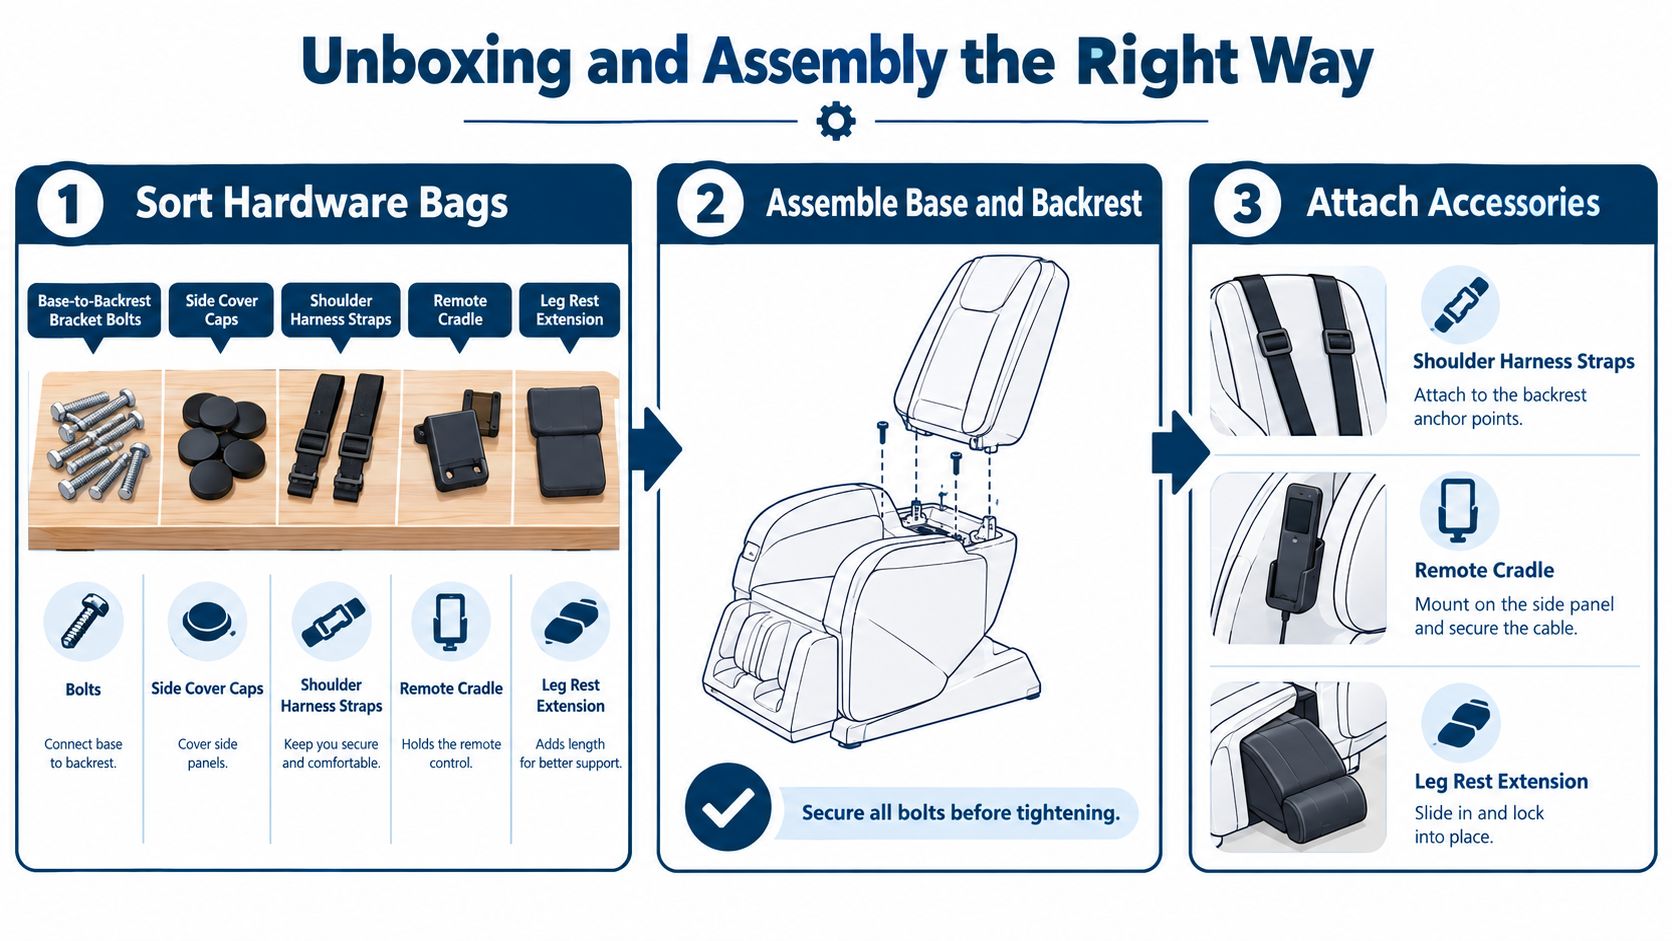
Lay every hardware bag on a clean surface before attaching anything. Create separate piles for the base-to-backrest bolts, side cover caps, shoulder harness straps, remote cradle, and leg rest extension. Match each pile to the diagrams in the booklet. If the manufacturer uses letters or colors, preserve those labels rather than combining similar-looking screws.
Align first, tighten second
The usual order is to unpack the components, align the seat, backrest, and base mechanisms, connect matching wiring harnesses, and then secure the power adapter and controls. This sequence is consistent with the assembly process described in a massage chair assembly manual, which also warns that connectors generally fit in one orientation.
Bring the backrest toward the base bracket without trapping the harness behind the joint. If the bracket doesn't line up, stop and reposition it. Never force a connector or bolt into place. A plug that seems almost aligned can bend pins, damage its housing, or create an intermittent fault that only appears when the chair reclines.
Insert the bolts loosely at first so the parts can settle into alignment. Check that the shoulder air hoses and electrical leads sit behind, rather than across, the recline linkage. Hoses routed in front of moving parts can kink during the first recline, reducing air pressure or restricting the movement.
Finish with a movement check
Recline the back fully before final tightening. That lets the geometry settle in the position the chair will use under load, rather than locking everything while the backrest is upright. Tighten side bolts evenly and firmly, but don't crush plastic covers or decorative shrouds.
Attach the shoulder straps, remote cradle, and leg rest extension only after the main structure is stable. Test the extension cord and shoulder airbags before replacing covers. If the massage chair manual calls for a particular connection order, follow it exactly, then inspect every plug once more before first power-on.
For a product designed around athletic recovery, review the recovery massage chair for athletes as an example of the features owners may need to identify during setup.
A visual walkthrough can help when diagrams feel ambiguous:
Electrical Setup and Room Placement
Electrical compatibility deserves more attention than it usually gets. One manual specifies 220–240V, 50/60Hz input requirements, while other products may be built for a different regional supply. Read the rating label on your chair and compare it with the local mains before using an adapter or converter. A plug-shape adapter changes the connection format. It doesn't automatically make the voltage safe.
Keep the chair away from water, damp rooms, direct heat, and hot ambient conditions. Your hands should be dry whenever you connect or disconnect the power, and you should switch the chair off before handling connectors. If your home has older wiring, ask a qualified electrician to verify the outlet and grounding rather than treating a faint tingling sensation as normal operation.
Make the room work for the chair
Measure the chair at full recline, not only in its upright showroom position. Leave the rear clearance specified by your own massage chair manual and enough open space for the leg rest to extend without striking a cabinet or blocking a walkway. Keep the power cord away from heaters, doorways, and the underside of the moving base, where the frame could pinch or shear it.
On carpet, a firm protective tray can help prevent casters or base movement from grinding the fibers. Don't place loose mats under moving sections, since they can shift into the mechanism. The best location is stable, dry, and easy to access from the front and sides.
| Requirement | Specification |
|---|---|
| Voltage | Match the chair's rating label and local mains |
| Grounding | Use a suitable grounded outlet |
| Environment | Keep away from damp areas and heat sources |
| Cable route | Keep clear of walking paths and moving parts |
| Room layout | Allow the manual's full recline and leg rest clearance |
A well-planned room supports consistent use. This guide to designing a functional home gym can help you position recovery equipment without turning the chair into an obstacle.
Reading the Remote and Control Panel
Most remotes become easier once you stop memorizing button names. Sort the controls into four families: intensity, position, manual targeting, and preset programs. Each family answers a different question. How strong should the massage feel? Where should your body sit? Which area needs attention? Do you want to choose the sequence yourself or let the chair run an automatic cycle?
Learn the four control families
Intensity controls often change more than one sensation at once. A stronger setting may increase roller pressure, motor speed, airbag compression, or a combination of these, depending on the model. If the pressure suddenly feels too much, reduce the setting before changing posture.
Recline and footrest controls shape contact. A more open position may distribute pressure across the back, while a more upright posture can make a targeted area feel more concentrated. Move slowly whenever another person is nearby, and make sure clothing, blankets, and cables aren't near the moving sections.
Manual point massage lets you select a body region instead of following the chair's programmed route. Use it sparingly at first. A precise setting can feel stronger because the rollers spend more time in one area.
Preset programs provide the simplest starting point. Look at the body-region icons rather than relying on appealing program names. A shoulder symbol, lower-back symbol, or foot symbol usually tells you more about the intended emphasis than a label such as “energy” or “refresh.”
Don't skip calibration
Many chairs include a body scan or shoulder-height calibration. Run it before your first session because the chair uses that information to position the rollers relative to your frame. If the scan feels incorrect, stop and reseat yourself rather than trying to compensate with higher intensity.
Some systems also use a pause or child-lock function. Pressing multiple controls at once may cancel a command instead of combining it, so give each button a moment to respond. For broader feature guidance, use this guide to full body massage chairs.
Choosing the Right Massage Program
Program names are marketing shorthand. The useful question is what the chair does to your body and whether that stimulus suits your current recovery state.
| Program | Technique | Intensity | Best For |
|---|---|---|---|
| Relax | Slow kneading and gentle rolling | Low | First sessions and general unwinding |
| Deep tissue | Concentrated pressure in a narrower area | Higher | Experienced users who tolerate focused pressure |
| Stretch | Recline and air compression that lengthens limbs | Variable | Mobility-focused relaxation when positioning feels secure |
| Sleep | Slow rocking, recline, and light rolling | Very light | Evening wind-down |
| Recovery | Alternating compression and release | Moderate | Post-training relaxation and lower-limb comfort |
A relax program is usually the sensible first choice because it lets you learn the chair's contact points without overwhelming a new body. Deep tissue is the program people most often overuse. Focused pressure can be useful, but discomfort isn't proof that the chair is working better.
Stretch programs feel different because they emphasize lengthening and positioning instead of repeated compression. Keep your hands and feet settled, and stop if the traction feels unstable. Sleep modes are better suited to a quiet evening than a demanding post-workout session, while recovery modes can complement a broader routine that includes hydration, gentle movement, and rest.
Contrast therapy can also fit into a recovery plan, but it shouldn't be added automatically. Heat in the chair may feel soothing before a cool-down, whereas a cold exposure may be more appropriate after strenuous training for some people. The right sequence depends on health status, training load, and tolerance. For selecting equipment around home wellness goals, compare wellness and recovery chairs by adjustability and fit, not by the strongest-sounding preset.
Session Length, Intensity, and Comfort
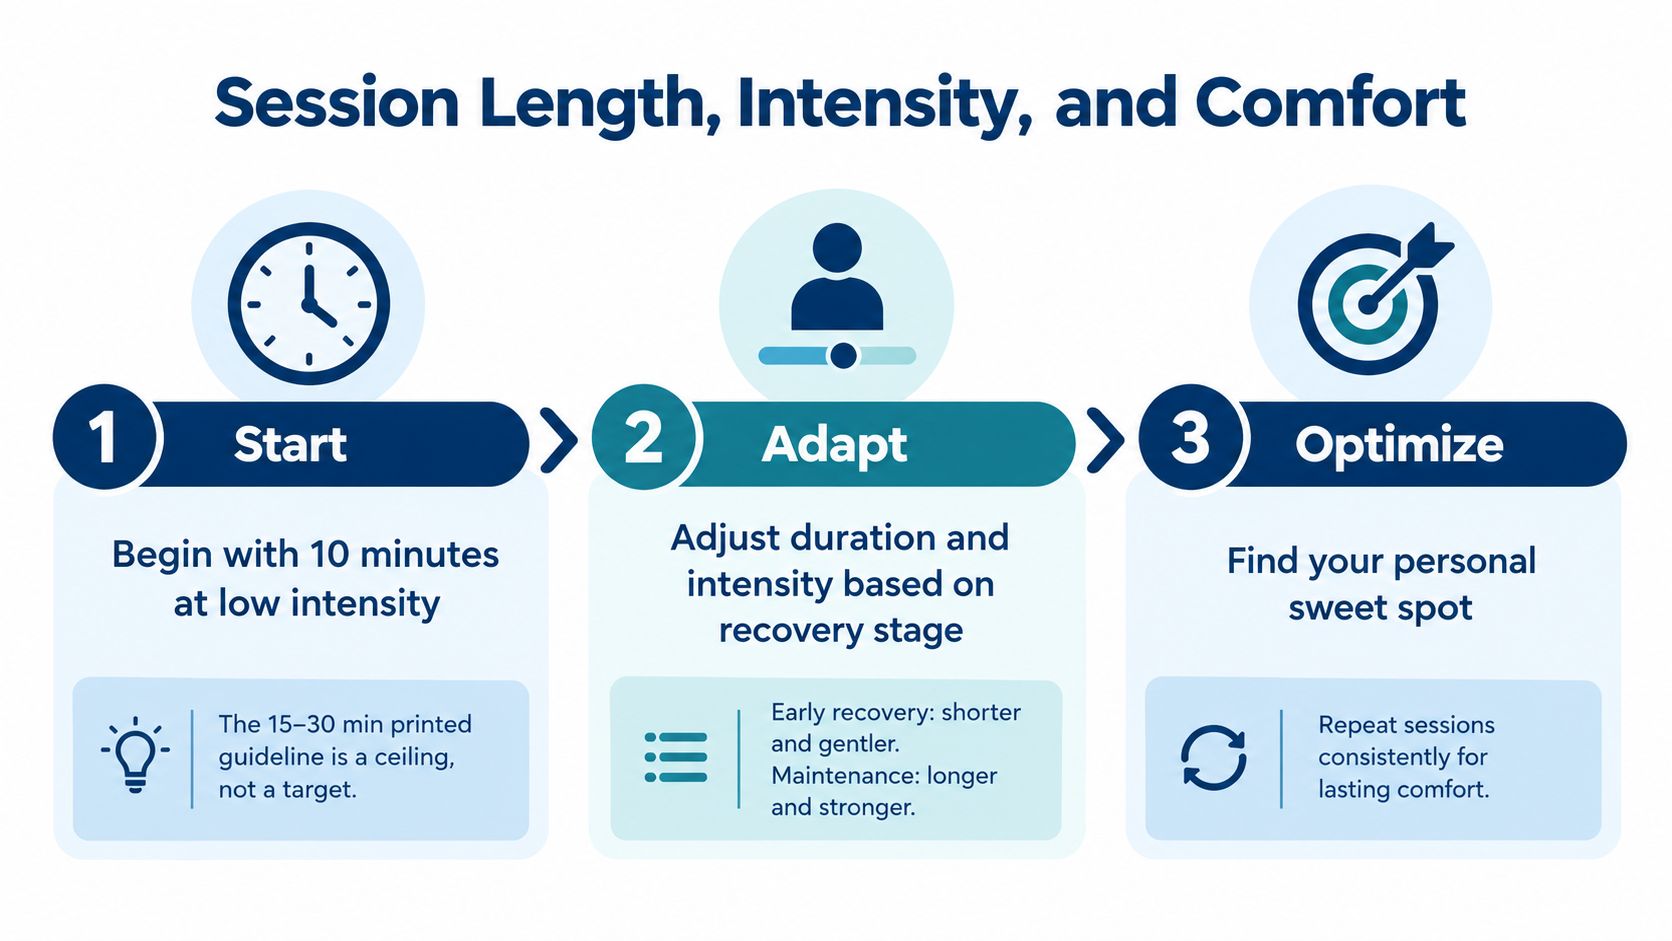
The printed 15-to-30-minute recommendation should be treated as a ceiling, not a target. New users often assume that a longer or harder massage must provide a better recovery effect, but the body responds to the total stimulus, pressure distribution, posture, and recovery stage. A chair should leave you more comfortable, not leave you feeling as though you need to recover from the session itself.
Start with the person, not the preset
For a generally healthy adult using a chair for the first time, begin with 10 minutes at low intensity. Sit with a neutral spine, keep your head supported, and notice whether the rollers track evenly across the shoulders and lower back. The objective is familiarization, not maximum pressure.
An older adult or particularly sensitive first-time user should start more gently and for less time. Keep the posture supported and avoid chasing a “deep” sensation. Airbags can feel surprisingly forceful even when the rollers feel mild, so reduce both components if the arms, calves, or feet become uncomfortable.
Someone returning from injury or surgery needs a clinician's clearance before using a powered massage chair. If use is approved, begin with a short, gentle session and a stable posture that doesn't pull on the healing area. Avoid placing direct pressure over an incision, swollen region, or area with altered sensation. A guide to the best massage chairs for spine recovery can help you evaluate positioning, but it can't replace individualized medical advice.
Adjust the variables in the right order
If a session feels unhelpful, don't increase intensity first. Try a shorter or longer program, change the target area, adjust the recline, or remove a thick buffer pad if the manual permits it. One manual advises changing posture, removing buffer material, or adjusting manual selections when the massage feels too weak or too strong. Those options recognize that body fit can matter as much as motor strength.
Use this simple progression:
- First session: Choose low intensity and a short duration.
- Next session: Change only one variable, such as posture or program.
- Later sessions: Increase duration or pressure only when the previous setting felt comfortable.
- Second session of the day: Keep it shorter than the first, especially after training or when soreness is already present.
Stop rule: End the session immediately for sharp, radiating, electric, dizzy, nauseating, or worsening pain. Lingering discomfort deserves attention rather than another preset.
Put care on the calendar
Synthetic leather needs gentle cleaning. Unplug the chair, use a soft damp cloth, and choose the solution recommended by the manufacturer. Avoid abrasive products, alcohol-based sprays, and silicone polishes, which can degrade the surface. Wipe the headrest and footrest more often because they contact skin and collect sweat, while side panels and the remote usually need less frequent attention.
A practical rhythm looks like this:
- Daily: Wipe skin-contact areas and check for visible spills.
- Monthly: Vacuum accessible seams and floor areas, then inspect air hose fittings and the power cord for pet damage.
- Quarterly: Check base bolts, sensors, roller-track debris, and moving clearances.
- Annually: Arrange professional service if the manufacturer recommends it or if performance has changed.
Don't move the chair while it's plugged in. Check the base bolts after the first month, listen for new mechanical noise, and inspect the footrest path before assuming a motor fault. Small checks prevent a loose fitting or chewed cord from becoming a larger repair.
Troubleshooting What Actually Goes Wrong
“Unplug it and try again” is useful only when you know what happened next. A better approach groups the problem by source: power, mechanical movement, sensors, or controls. Some symptoms are appropriate for a careful owner check. Others mean the chair should remain off until qualified support examines it.
| Symptom | Likely Cause | Fix at Home | Call Service If… |
|---|---|---|---|
| No response | Outlet, switch, plug, fuse, or reset issue | Confirm the outlet, power switch, and fully seated plug | The chair remains dead after a careful reset |
| Footrest won't move | Obstruction or sensor interruption | Remove objects and check the travel path | The movement remains blocked or the motor strains |
| Airbags feel uneven | Pinched hose or loose fitting | Inspect accessible hoses without opening electrical covers | A hose is damaged or pressure remains abnormal |
| Remote does not respond | Child lock, controller, or connection fault | Check the lock state and visible connections | Controls remain unresponsive or the fault repeats |
| Grinding or burning smell | Mechanical or electrical failure | Switch off and unplug | Always, especially with heat, smoke, or metal-on-metal noise |
| Repeated error code | Overload, short circuit, board, transformer, or controller fault | Record the code and perform only the manual's approved reset | The code returns after reset |
The service documentation linked in this massage chair fault guide distinguishes several electrical and control failures rather than treating every problem as a loose plug. That distinction matters. A user can inspect a visible cable or clear an obstruction, but opening the controller, transformer, or electrical board is technician work.
Try a failed operation once more after checking the simple cause. If the chair fails twice on the same day, stop testing and document the code, sound, smell, movement, and conditions when it happened. Burning odor, grinding metal, water ingress, repeated error codes, and any exposed or damaged power cable are stop-use symptoms.
Use contrast therapy with restraint
For a healthy athlete, deliberate temperature contrast may complement a massage session. A practical protocol is 15 to 20 minutes of heated massage followed by 2 to 5 minutes of cold plunge at 50 to 59°F, or a 15-minute ice-pack wrap when a plunge isn't available. Heat first may help the tissue feel relaxed and improve local blood flow, while cold afterward can feel useful for post-training soreness and perceived inflammation.
Don't treat the sequence as a cure or force yourself through extreme temperatures. Cold before the chair can make tissue feel less responsive and may encourage you to increase pressure without accurately sensing it. The chair and temperature exposure are recovery tools, not substitutes for evaluation.
Skip the chair for acute sprains or strains less than 72 hours old, fever, open wounds, pregnancy, uncontrolled hypertension, recent surgery, or sharp or radiating pain during a session. People with circulation conditions, implanted devices, altered sensation, or uncertain medical status should ask a clinician before using massage or heat.
Before contacting support, gather the model, serial number, purchase date, error code, and a short video of the fault. A clear record helps the service team distinguish a setup issue from a component failure and reduces repeated trial-and-error.
MedEq Fitness offers physician-led recovery equipment, including massage chairs and complementary wellness systems, for home users, athletes, clinics, and performance facilities. Visit MedEq Fitness to explore recovery equipment and get support choosing a setup that fits your space, routine, and care goals.